Dynamic imaging
Create images of any size or style instantly. It's fast and easy, with no technical knowledge required. Each option is explained in this guide, with a list of 100 options below.
For best results, we recommend uploading your highest quality images.
URL format
New images are created by appending options to the image URL.
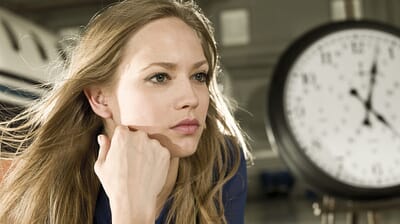
This image has no options:
https://demo.sirv.com/looks.jpg
This image has options which scale it to 300px (notice w in the URL, which stands for width):
https://demo.sirv.com/looks.jpg?w=300

Pixel values are referenced using the number only. For percentage values, always use the '%' sign, e.g. 40%.
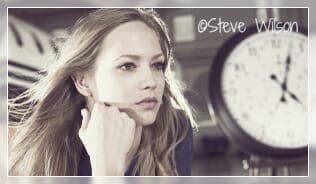
Here is the same image with lots more options - note that multiple parameters in the URL are separated by the '&' character:
https://demo.sirv.com/looks.jpg?w=300&colortone=texas&frame.style=mirror&text=%C2%A9Steve%20Wilson&text.size=40%&text.color=white&text.position=northeast&text.font.family=Shadows%20Into%20Light%20Two
Options
Every option is described, with examples, to the left.
Your options may also be saved as a profile, which is handy for applying the same options to many images.
Table of options
Use over 100 options to customize your images:
| Option | Default | Options | Description |
|---|---|---|---|
| w | dynamic | px or % | Width of image. |
| h | dynamic | px or % | Height of image. |
| scale.option | fit | fit (fit specified area), fill (fill specified area), ignore (ignore aspect ratio), noup (no upscaling) | Image scaling options. |
| rotate | 0 | -180 to 180 | Number of degrees to rotate the image. |
| opacity | 100 | 0 to 100 | Opacity of PNG images. |
| brightness | 0 | -100 to 100 | Change the brightness of the image. |
| contrast | 0 | -100 to 100 | Change the contrast of the image. |
| exposure | 0 | -100 to 100 | Change the exposure of the image. |
| hue | 0 | -100 to 100 | Change the hue of the image. |
| saturation | 0 | -100 to 100 | Change the saturation of the image. |
| lightness | 0 | -100 to 100 | Change the lightness of the image. |
| shadows | 0 | -100 to 100 | Change the shadows of the image. |
| highlights | 0 | -100 to 100 | Change the highlights of the image. |
| colorlevel.black | 0 | 0-254 | Adjust black level of image. |
| colorlevel.white | 255 | 1-255 | Adjust white level of image. |
| histogram | rgb | r/g/b | Display a histogram of RGB levels. |
| grayscale | false | true / false | Make the image black & white. |
| blur | 0 | 0 to 100 | Blur the image. |
| sharpen | 0 | 0 to 100 | Sharpen the image. |
| colorize.color | black | hex RGB or color name | Overlay a color on the image. |
| colorize.opacity | 100 | 0 to 100 | Opacity of the color overlay. |
| colortone | none | sepia, warm, cold, sunset, purpletan, texas, aurora, blackberry, coffee, clearwater, dusk, stereo, none | Change the color tone of the image. |
| colortone.color | 000000 | hex RGB or color name | Apply a color tone to an image. |
| colortone.level | 100 | 0 to 100 | Set the level of blending with the original image. |
| colortone.mode | solid | solid, highlights, shadows | Apply the color tone to the entire image or shadows/highlights only. |
| vignette.value | 20 | 0 to 100 | Adjust the depth of the vignette. |
| vignette.color | 000000 | hex RGB/RGBA or color name | Add a vignette (dark edges) around the image. |
| format | jpg | jpg, png, webp, optimal, original | Image format served (about WebP, about optimal). |
| webp-fallback | Original | jpg, png | Image format for browsers without WebP support. |
| q | 80 | 0 to 100 | JPEG image quality (percentage). |
| progressive | false | true / false | Load JPEG images progressively. |
| subsampling | 4:2:0 | 4:4:4, 4:2:2, 4:2:0 | Chroma subsampling to reduce JPEG file size. |
| png.optimize | false | true/false or 1/0 | Apply PNG optimizations to reduce PNG file size. |
| filter | Mitchell/Lanczos | Bartlett, Blackman, Bohman, Box, Catrom, Cosine, Cubic, Gaussian, Hamming, Hann, Hermite, Jinc, Kaiser, Lagrange, Lanczos, Lanczos2, Lanczos2Sharp, LanczosRadius, LanczosSharp, Mitchell, Parzen, Point, Quadratic, Robidoux, RobidouxSharp, Sinc, SincFast, Spline, Triangle, Welch | Resize filter. |
| gif.lossy | 5 | 0-100 | Apply lossy compression, to reduce GIF file size. |
| cw | px or % | Crop the image to a specific width. | |
| ch | px or % | Crop the image to a specific height. | |
| cx | 0 | px or % or 'center' | Position to start image crop (from top). |
| cy | 0 | px or % or 'center' | Position to start image crop (from left). |
| autocrop | false | true/false | Automatically crop to detected edge of image contents. |
| s | px | Resize the image by its longest dimension. | |
| thumbnail | 256 | px | Create a square thumbnail of the image, up to 1000px. |
| page | 0 | number | Page number of PDF when converted to image. |
| text | Display text on your image. | ||
| text.size | 25 | % | Width of text area in relation to image. |
| text.font.size | px | Fix the size of the text in px. | |
| text.font.style | normal, italic | Style of the text. | |
| text.font.family | Open Sans | Any Google Fonts or Google Noto fonts | Choose a font e.g. "Open Sans". |
| text.font.weight | 400 | 300, 400, 600, 700, 800 | Choose font weight (light, normal, semi-bold, bold, extra-bold). |
| text.color | grey | hex RGB/RGBA or color name | Text color e.g. E0AA80 or E0AA8020. |
| text.opacity | 100 | 0 to 100 | Text opacity. |
| text.outline.width | 0 | px | Add an outline around the text. |
| text.outline.color | 000000 | hex RGB/RGBA or color name | Color of the text outline. |
| text.outline.opacity | 100 | 0 to 100 | Opacity of the text outline. |
| text.outline.blur | 0 | px | Blur the edge of the text outline. |
| text.background.color | hex RGB/RGBA or color name | Background color e.g. E0AA80 or E0AA8020. | |
| text.background.opacity | 100 | 0 to 100 | Background opacity. |
| text.align | center | right, left, center | Align the multiline text. |
| text.position | southeast | north, northeast, northwest, center, south, southeast, southwest, east, west | Location of the text on the image. |
| text.position.x | no default | % or px | Location of the text (from left). |
| text.position.y | no default | % or px | Location of the text (from top). |
| text.position.gravity | northwest | north, northeast, northwest, center, south, southeast, southwest, east, west | Master location of the text on the image. |
| watermark | Filepath of the image to be overlayed. | ||
| watermark.position | center | north, northeast, northwest, center, south, southeast, southwest, east, west, tile | Position of the watermark on the image. |
| watermark.position.x | no default | % or px | Location of the watermark (from left). |
| watermark.position.y | no default | % or px | Location of the watermark (from top). |
| watermark.position.gravity | northwest | north, northeast, northwest, center, south, southeast, southwest, east, west | Master location of the watermark on the image. |
| watermark.scale.width | dynamic | px or % | Width of watermark. |
| watermark.scale.height | dynamic | px or % | Height of watermark. |
| watermark.scale.option | noup | noup (no upscale), fit (fit specified area), fill (fill specified area), ignore (ignore aspect ratio) | Options to scale the watermark image. |
| watermark.rotate | 0 | -180 to 180 | Rotate the watermark (degrees). |
| watermark.opacity | 100 | 0 to 100 | Opacity of the watermark image. |
| watermark.layer | front | front / back | Place the layer in front or behind main image. |
| watermark.canvas.color | hex RGB/RGBA or color name | Color behind watermark e.g. E0AA80 or E0AA8020. | |
| watermark.canvas.opacity | 100 | 0 to 100 | Opacity of watermark background. |
| watermark.canvas.width | px or % | Width of canvas. | |
| watermark.canvas.height | px or % | Height of canvas. | |
| watermark.crop.x | 0 | px or % | Position to start image crop (from top). |
| watermark.crop.y | 0 | px or % | Position to start image crop (from left). |
| watermark.crop.width | px or % | Width of watermark. | |
| watermark.crop.height | px or % | Height of watermark. | |
| frame.style | solid | solid, mirror, edge, dither, none | Add a frame around the image. |
| frame.color | none | hex RGB/RGBA or color name | Frame color e.g. E0AA80 or E0AA8020. |
| frame.width | 5% | px or % | Frame width. |
| frame.rim.color | white | hex RGB/RGBA or color name | Frame rim color e.g. E0AA80 or E0AA8020. |
| frame.rim.width | 1 | px | Frame rim width. |
| canvas.width | px or % | Create a canvas around the image (width). | |
| canvas.height | px or % | Create a canvas around the image (height). | |
| canvas.color | hex RGB/RGBA or color name | Color of the canvas e.g. E0AA80 or red. | |
| canvas.position | center | north, northeast, northwest, center, south, southeast, southwest, east, west | Position of the canvas behind the image. |
| canvas.opacity | 100 | 0 to 100 | Opacity of the canvas. |
| canvas.border.width | 0 | px or % | Adds additional width left and right of the canvas. |
| canvas.border.height | 0 | px or % | Adds additional height above and below the canvas. |
| canvas.border.color | lightgray | hex RGB/RGBA or color name | Color of the canvas border e.g. E0AA80 or red. |
| canvas.border.opacity | 0 | 0 to 100 | Opacity of the canvas border. |
Optimization
Every image served from your Sirv account benefits from these space-saving optimizations:
- Metadata is removed.
- PNG images are optimized and re-encoded with Huffman compression.
- Your default image settings are applied, such as 80% JPEG quality (defaults can be changed).
- If your original images are WebP, they will be automatically converted to JPEG or PNG for non-supporting browsers.
Color
All color parameters in Sirv are applied in the same way, with RGB or RGBA references.
Parameters that have color are:
- vignette.color
- text.color
- text.outline.color
- text.background.color
- watermark.canvas.color
- frame.color
- frame.rim.color
- canvas.color
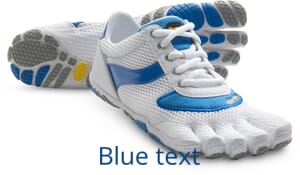
To set a solid color, use a standard RGB reference such as 01417F in your URL or profile), for example:
https://sirv.sirv.com/Examples/test-vibram.jpg?text.position=southwest&text=Blue%20text&text.size=40%&text.color=01417F
Profiles
You can apply the same options to multiple images by creating profiles.
Profiles let you quickly create and manage image styles on your website. When you change the settings for a profile it will update every image on your site which references that profile.
To apply a profile to an image, add the following to the end of the URL:
?profile=name
name is the name of the profile you'd like to apply (found in /Profiles directory). For example:
https://demo.sirv.com/look.jpg?profile=Example-Text

Profiles are text files stored in your account written in JSON. They're easy to create, by choosing from various options in your account.
Here's an example, of the content inside a Profile. This one will apply a text layer to your images and spins:
{
  "image": {
    "scale": {
      "width": 1280
    },
    "frame": {
      "style": "none"
    },
    "text": {
      "text": "Text overlay",
      "style": "simple",
      "font": {
        "family": "Open Sans"
      },
      "position": "southeast",
      "color": "cyan",
      "opacity": 50,
      "background": {
        "color": "red",
        "opacity": 10
      },
      "size": 34
    }
  },
  "spin": {
    "width": 400,
    "zoom": 2.5
  }
}
To create a profile, go to your Profiles folder and click the "Create profile" button.
Profiles are stored as JSON text files in your /Profiles directory.
Order of processing
Image processing options are applied in the following order:
- Auto-crop
- Scale
- Crop
- Canvas
- Rotate
- Other options
For example, if you set scaling and cropping options, the image will first be scaled and then be cropped. The order of options in the URL does not affect the order of image editing.
If the same option is applied via multiple sources, the source with the highest priority is used, in this hierarchy:
- URL
- Profile
- Default profile
For example, if quality is not set in either the URL or a profile, the quality from the Default profile will be used (80% by default). If quality is set via a custom profile and also in the URL (e.g. q=75), the setting in the URL will take precedence.
Special characters
Different browsers render URLs differently and sometimes unpredictably. If you're adding special characters to your URL (perhaps to create a text overlay), you may need to use the ASCII equivalent:
| ASCII Character | URL-encoding |
|---|---|
| space | %20 |
| / | %2F |
| ! | %21 |
| " | %22 |
| # | %23 |
| $ | %24 |
| % | %25 |
| & | %26 |
| ' | %27 |
| ( | %28 |
| ) | %29 |
| * | %2A |
| + | %2B |
| , | %2C |
| © | %A9 |
| More... | More HTML character codes |
Retina support
Sirv can serve tailored images to Retina and hi-res displays.
There are 3 methods for doing this:
1. Use the srcset attribute in your img tag. This way the user's browser will automatically load the appropriate image according to their display's pixel density.
<img src="https://demo.sirv.com/look.jpg" srcset="https://demo.sirv.com/look.jpg?w=400 1x, https://demo.sirv.com/look.jpg?w=800 2x, https://demo.sirv.com/look.jpg?w=1200 3x" width="400" />
2. Alternatively, you can reference the sirv.js script in your page and Sirv will automatically detect the users display and serve hi-res images to hi-res screens and standard images to non-hi-res screens. Refer to the responsive imaging documentation and the responsive imaging examples.
3. Instead of opening sirv.js (option 2 above), you can use your own JavaScript to detect the users' display. Then you can fetch the appropriate hi-res or standard-res image at the dimensions you require.
Download URL
To download a file on Sirv, simply append ?dl to the URL to trigger a browser download. For example:
https://demo.sirv.com/example.jpg?dl
The download parameter can also be added with other parameters. Here's the same image, resized and with a frame:
https://demo.sirv.com/example.jpg?w=500&frame.style=mirror&frame.width=25&dl
Here's a PDF converted to a 600px image:
https://demo.sirv.com/dyson.pdf?w=600&dl
The dl option downloads a processed image with the default account settings plus additional settings in the URL. It cannot be used to download the unmodified original image.
URL errors
If there is an error in your URL, an error message will be returned. To see the message, simply visit the image URL in your browser.
The URL below has an error. It should create a 50% width image but width is misspelt as wdth:
https://demo.sirv.com/look.jpg?scale.wdth=50%
Click the URL below to see the error message:
https://demo.sirv.com/look.jpg?scale.wdth=50%
There is no such option as wdth so the message reads "Additional properties not allowed":
{
  "name": "ApiDataValidationError",
  "message": "Supplied data is not valid",
  "validationErrors": [
    {
      "code": "OBJECT_ADDITIONAL_PROPERTIES",
      "message": "Additional properties not allowed",
      "path": "#/scale",
      "params": {
        "properties": [
          "wdth"
        ]
      }
    }
  ]
}
If you embed a broken image URL in your web page, nothing will be displayed. To see the error message, visit the image directly in your browser.
Caching & deletion
When images are requested for the very first time, Sirv creates them on-the-fly. Once an image exists, it is cached and ready to be rapidly served to anyone else to view.
If nobody views a Sirv generated file for 30 days it will be deleted. Your original images are unaffected - they are never deleted by Sirv.
If you delete images, they go to the Trash for 30 days. You can recover the files simply by moving them out of Trash and into another folder.
Timestamps
If a URL contains a timestamp (e.g. for file versioning), this will be ignored because Sirv is designed for on-the-fly processing and CDN caching. Sirv instantly invalidates old files, so timestamping via the query string is not required. Instead, to update an old file, you should either overwrite the original file with the new one or change its name.
Master images
The bigger the images you upload, the more options you'll have. For best results, we recommend:
- 2500-4000px width
- 92% JPEG quality or higher
Sirv hosts and delivers any image type (and other files too). It automatically resizes and optimizes images to suit your users device, keeping the originals untouched. If you upload big, high-quality images, you can confidently deliver superb quality Sirv Zooms and permit glorious clarity on hi-res retina screens.
Upload images into your account or check the various image uploading options.