Hotspots on a 360 spin
This tutorial explains how to add hotspots to your 360 spins.
Hotspots draw attention to particular features of your 360 degree spinning product.
The pink running shoe below has 23 hotspots and 2 messages on click. The message uses HTML, so can be styled however you like with text, images, videos etc.
Instead of revealing a message, hotspots can also be configured to immediately link to a URL.
How to add hotspots
Step 1: Create 2 hotspots
1. Right-click on a .spin file to download it from your Sirv account. If you don't have a Sirv account, create one here.

2. Open it in a text or code editor (e.g. Notepad on Windows or TextEdit on Mac).
3. Scroll to the settings section at the end of the file.
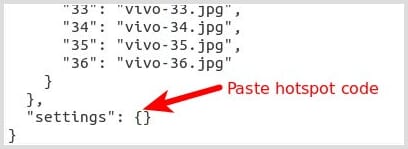
Between the curly braces {}, paste this code:
"hotspots": [{
  "data": "<div>This hotspot shows on frame 1. You can put anything you want here - images, movies, links etc.</div>",
  "frames": {
    "1": {
      "pointer": {
        "style": "d1",
        "x": "20%",
        "y": "20%"
      },
      "box": {
        "x": 50,
        "y": 50
      }
    }
  }
}, {
  "data": "<div>This hotspot shows on frame 2.</div>",
  "frames": {
    "2": {
      "pointer": {
        "style": "d1",
        "x": "80%",
        "y": "20%"
      },
      "box": {
        "x": 0,
        "y": -0
      }
    }
  }
}]
That code will add two hotspots to your spin.
You can add HTML to the hotspot images (embed images, audio, video, buttons etc). All " characters should be escaped with a leading \ like this: \".
4. Save the file with a new file name.
5. Upload the new spin file to the same page in your Sirv account where you downloaded it from.
6. Preview your spin file and you'll see two yellow hotspots: one on the left of frame 1 and one on the right of frame 2.
Step 2: Set the hotspot locations
Sean Stoops has kindly shared his hotspot configurator for Sirv.
1. Go to the configurator:
http://brutimus.github.io/sirv-configurator/
2. Enter the URL of your spin file e.g.
https://sirv.sirv.com/Examples/drill/drill.spin
3. Choose the hotspot style and the x/y coordinates for the message (or place the message immediately below right to the hotspot).
4. In each image of your spin, click where you'd like the hotspot to be positioned.
5. Once you've clicked all the positions you want, copy and paste the hotspot code into your .spin file.
Step 3: Change the styles
If you're happy with the look of the hotspots, you can skip this step.
1. Three different hotspot styles are available: d1, d2, d3. They are 25px transparent PNGs:
d1: ![]()
d2: ![]()
d3: ![]()
This demo uses d1. You can choose another style by changing to d2 or d3 in the code:
"style": "d2",
You can tweak the style by using CSS, or create a completely new style of your own. Add some CSS to your web page with your changes, for example:
<style type="text/css" media="screen">
.hotspot-pointer {
  width: 50px !important;
  height: 50px !important;
}
.hotspot-pointer.d1 {
  background-image: url('http://youraccount.sirv.com/your-image.png');
}
.hotspot-pointer:hover {
}
</style>
2. To change the style of the message box, add a CSS style for hotspot-box, for example:
.hotspot-box {
  width: 160px !important;
  height: 86px !important;
  padding: 16px 20px !important;
  background: #fff !important;
  color: #333 !important;
  font-family: Arial, Helvetica, sans-serif !important;
  font-size: 14px !important;
  text-align: left !important;
  line-height: 170% !important;
  -moz-box-shadow: #000 !important;
  -webkit-box-shadow: #000 !important;
  box-shadow: #000 !important;
  border-collapse: separate;
  -webkit-border-radius: 4px;
  -moz-border-radius: 4px;
  border-radius: 4px;
}
You can change as much or little of the CSS styles as you wish.
Show images in your messages
If you'd like to place an image inside a hotspot message, first upload the images to your Sirv account.
We'll add these two images to the spin:


The file locations inside our Sirv account are:
- //sirv.sirv.com/website/demos/vivo/close-up1.jpg
- //sirv.sirv.com/website/demos/vivo/close-up2.jpg
To show these images inside the messages, replace these two messages:
"data": "<div>This hotspot shows on frame 1. You can put anything you want here - images, movies, links etc.</div>",
"data": "<div>This hotspot shows on frame 2.</div>",
with these messages:
"data": "<div><img src=\"https://sirv.sirv.com/website/demos/vivo/close-up1.jpg\" width=\"160\" height=\"159\" /></div>",
"data": "<div><img src=\"https://sirv.sirv.com/website/demos/vivo/close-up2.jpg\" width=\"160\" height=\"160\" /></div>",
Note how the " characters have been escaped with \ (required, or the spin won't display).
The final result
Here's the new spin, showing the images inside the messages:
The content of hotspot images is HTML, so you can put any mixture of text, images, movies or any other content as you wish.
Manual configuration of hotspot locations
Instead of using Sean Stoops quick hotspot configurator, you can follow these manual instructions.
1. To change the position of the hotspots, adjust the x and y coordinates for the pointer. Coordinates start from 0, 0 in the top left corner of the image, where x measures the distance from left to right and y measures top to bottom.
Coordinates can be set in px, for example:
"x": 150,
"y": 235
Coordinates can also be set with a percentage, escaped with " ". For example:
"x": "42%",
"y": "37%"
In most cases, you should use percentages so that each hotspot is located in the correct location if you wish to embed the spin at a different size in future.
2. The same message can be added to many frames. The frame number for each image is listed at the top of your .spin file, starting at "1".
The code below will place the first message on frames 1, 2, 3 and 4. Notice how the frame numbers are referenced as "1", "2", "3", "4":
"frames": {
  "1": {
    "pointer": {
      "style": "d1",
      "x": "20%",
      "y": "20%"
    },
    "box": {
      "x": 50,
      "y": 50
    }
  },
  "2": {
    "pointer": {
      "style": "d1",
      "x": "24%",
      "y": "20%"
    },
    "box": {
      "x": 50,
      "y": 50
    }
  },
  "3": {
    "pointer": {
      "style": "d1",
      "x": "28%",
      "y": "20%"
    },
    "box": {
      "x": 50,
      "y": 50
    }
  },
  "4": {
    "pointer": {
      "style": "d1",
      "x": "32%",
      "y": "20%"
    },
    "box": {
      "x": 50,
      "y": 50
    }
  }
3. Each message box can be positioned independently, so that they are in a suitable location.
The x and y coordinates are specified in px and can be either positive or negative values. The default value of 0 and 0 will place the top left corner of the message box directly under the hotspot.
This example will move the message 40px below the hotspot and 200px to the left:
"box": {
  "x": -200,
  "y": 40
Summary
Use this tutorial to understand the setup process for hotspots on 360 spin images.
It typically takes between 5 minutes and 60 minutes to configure hotspots and their messages, depending how you want them to look. Use Sean Stoops configurator to accelerate the process. Later, Sirv will release a hotspot wizard for easy configuration.